Building a concrete fish pond is a much more permanent project than installing a flexible liner or preformed pond. Done properly, a rigid pond can provide an excellent home for koi and can be designed around bottom drains, skimmers, returns and substantial filtration. The disadvantage is that mistakes made during the construction are much harder to correct later.
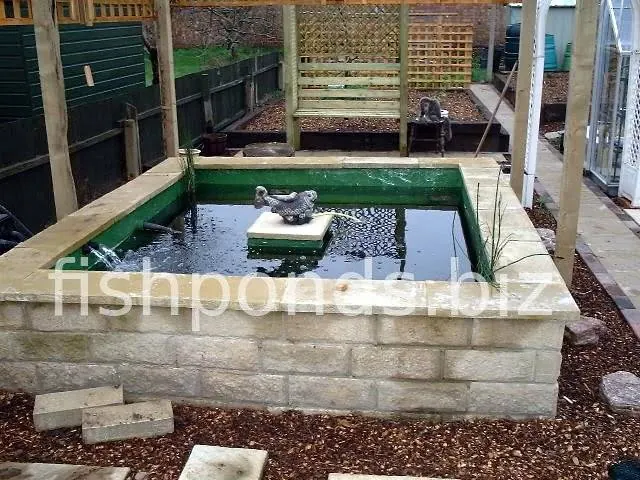
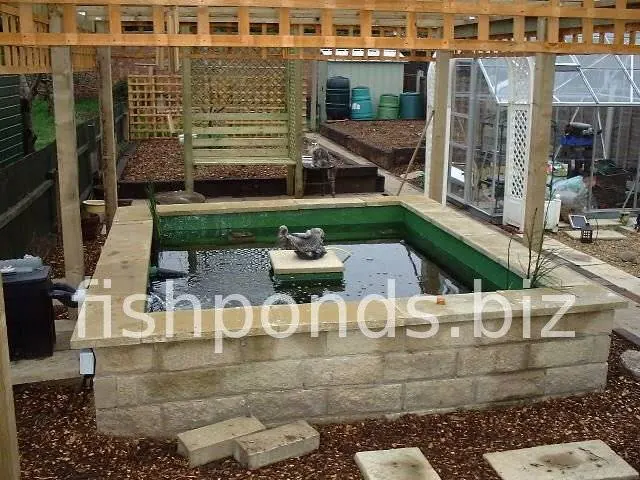
The pond shown in the photographs on this page was a real DIY project. It was built partly below ground and partly above ground using a concrete base, concrete blocks, render and a pond-safe waterproof coating. The experience is still useful, but this updated guide separates the lessons from that project from structural details that should be determined for each individual pond.
Treat a concrete pond as a water-retaining structure, not simply as a hole lined with concrete blocks. Decide the pond dimensions, filtration, drains, returns, waterproofing system and finished water level before excavation begins.
Large ponds, raised ponds, difficult ground conditions, high groundwater or substantial retaining walls may require professional structural design. Local building, electrical and safety requirements also need to be considered.
Concrete fish pond design: plan before you dig
The most important decisions in a concrete pond project are made before the first soil is removed. Changing the position of a return pipe is easy on a drawing. Changing it after the concrete and waterproofing are finished is a very different job.
Choose the location
A pond that can be seen and enjoyed from the house or main garden area is more likely to be monitored regularly. Good access is also important because filters, pumps, drains and pipework will eventually need maintenance.
Avoid placing the pond where large quantities of leaves and organic debris will constantly fall into the water. At the same time, the answer is not necessarily to place a koi pond in permanent deep shade. A balance of sun and shade is usually preferable, and additional shade or shelter can be incorporated into the design where necessary.
Decide the size and depth
Koi grow into large fish and need considerably more water volume and swimming space than a small ornamental goldfish pond. A depth of roughly 1.5–2 metres (about 4–6 feet) is a common target for a dedicated koi pond, although climate, pond design and the size and number of fish should all be considered.
Do not design the pond only around the small koi that you plan to buy today. The filtration system, water volume and swimming space need to remain suitable as those fish grow.
Think about the shape
Simple shapes are generally easier to build, reinforce and waterproof. Rectangular or gently curved ponds also make it easier to predict the water volume and plan drains and returns.
Good circulation is more important than following a rule that every corner must be rounded. The position and direction of returns, drains and skimmers should help move suspended waste toward the filtration system and avoid areas where debris continually settles.
Raised or fully in-ground?
The original pond shown here was built approximately half below ground and half above ground. This reduced the amount of excavation required and created a raised edge that was convenient for viewing and maintenance.
A raised design also means that part of the wall has to retain the full outward pressure of the pond water without support from the surrounding soil. The walls therefore need to be designed as structural pond walls rather than ordinary decorative garden blockwork.

Plan the filtration and pipework before construction
One of the biggest advantages of building a concrete koi pond is that the plumbing can be incorporated into the structure. It is also one of the biggest opportunities to make a permanent mistake.
Before constructing the base or walls, decide where the filtration equipment will be located and how water will travel between the pond and the filter. Depending on the design, this can include:
- bottom drains;
- surface skimmers;
- underwater returns;
- pump suction and return lines;
- air lines;
- overflow pipework;
- filter waste drains;
- electrical supplies for pumps, UV units and aeration.
For a gravity-fed koi filtration system, water can leave the pond through bottom drains or skimmers and move to the filter under gravity before being pumped back to the pond. Pump-fed systems arrange the equipment differently. The filtration design therefore needs to be chosen before the positions and levels of the pipes are fixed into the concrete.
For more information about filtration layouts and filter media, see our guide to fish pond filters.
Concrete pond construction sequence
Every project is different, but the overall construction process normally follows the same basic order.
- Set out the finished pond. Mark the walls, water level, filter area and access routes. Check the dimensions before excavation begins.
- Excavate the pond and prepare the ground. Remove unstable material and prepare a firm, properly compacted base. Ground conditions, drainage and groundwater need to be considered before the structural work begins.
- Install drains and structural pipework. Bottom drains and any pipework that must pass through or beneath the structure should be positioned before the base is poured.
- Construct the reinforced base. The slab must support the pond and control cracking under the actual site conditions. Its thickness, reinforcement and concrete specification should be appropriate to the particular design rather than copied from another pond.
- Build the pond walls. These may be formed from reinforced concrete or appropriately designed concrete blockwork. Raised walls must withstand the outward pressure created by the water.
- Complete penetrations, returns and skimmers. Check every pipe and fitting before they become inaccessible.
- Render or prepare the internal surface if required. The required finish depends on the waterproofing system that will be used.
- Cure the concrete and render correctly. Concrete develops its properties through hydration. Follow the curing requirements for the concrete or render rather than simply waiting for the surface to look dry.
- Apply the waterproofing system. Use a system suitable for permanent immersion and suitable for a pond containing fish, following its current substrate-preparation and curing instructions.
- Leak-test the completed pond. Confirm that the shell, penetrations and pipework remain watertight before landscaping makes repairs difficult.
- Install and commission the filtration. Only after the hydraulic system is working correctly should the pond move toward biological cycling and stocking.
Poured concrete or concrete block pond?
Both methods can be used to create rigid ponds, and many DIY koi ponds combine a reinforced concrete base with concrete masonry walls.
Poured reinforced concrete
A properly designed reinforced concrete shell can create a very strong, continuous structure. It is particularly useful where the pond shape, ground conditions or loading make a monolithic structure desirable.
The disadvantage for a DIY builder is that forming, reinforcing and placing a large amount of concrete correctly requires planning, equipment and experience. Once the concrete is placed, correcting errors can be difficult.
Concrete block pond
Concrete masonry blocks can make the wall construction easier to manage in stages and are popular for rectangular and raised koi ponds. Search terms such as "cinder block pond" are still common, although modern pond walls are normally built with concrete masonry units rather than traditional cinder blocks.
The fact that blocks are easy to lay does not mean that any block wall will automatically be strong enough to retain several tonnes of water. Reinforcement, block type, wall thickness, foundations and connections to the base all depend on the design.
The original pond on this page used solid concrete blocks because they were simple for a relatively inexperienced DIY builder to handle. That describes this particular project; it should not be treated as a structural specification for every concrete pond.
How thick should a concrete pond base be?
There is no useful universal answer such as "every koi pond needs a six-inch base." The required slab depends on the pond dimensions, soil and groundwater conditions, reinforcement, concrete properties and whether the walls and floor are designed to act together.
A large concrete pond contains an enormous mass of water. Raised walls also experience substantial lateral loading, while groundwater can create uplift forces on an empty pond. Freeze-thaw conditions can introduce additional requirements in cold climates.
For a small DIY project on predictable ground, builders may use established local construction details. For a large, raised or structurally demanding pond, having the shell designed by someone competent in structural concrete is a far better approach than copying the slab thickness from another garden pond.
What concrete mix ratio should be used for a pond?
Searches for a single "pond concrete mix ratio" are understandable, but a water-retaining structure should not be designed around a universal bucket ratio of cement, sand and aggregate.
Concrete is specified according to the strength, durability, exposure and structural requirements of the project. The reinforcement, joint design and control of cracking are just as important as the nominal strength of the concrete.
If ready-mixed concrete is being supplied for a structural pond slab or shell, tell the supplier or designer what the concrete will be used for and use the specified mix rather than modifying it on site by adding extra water.
Building the walls and forming the pond
Once the base has reached the stage at which wall construction can proceed, the shell can begin to take its final shape.
Keep checking dimensions, levels and vertical alignment throughout the build. Small errors near the bottom of a wall become much more obvious by the time the coping is installed.
Any return fittings, skimmers or pipe sleeves passing through the structure should be placed deliberately rather than drilled through finished waterproofing later wherever possible.
The original pond incorporated pipe sleeves near the top of the blockwork so that filter pipework could pass through the structure while remaining hidden. A modern gravity-fed koi pond may have substantially more pipework, especially where bottom drains and dedicated underwater returns are incorporated.
Preparing the inside of a concrete pond
The internal surface preparation depends on the chosen waterproofing system. Rendered blockwork may require a smooth but suitably keyed cementitious finish, while other systems have their own preparation requirements.
Sharp projections, voids and damaged areas should be corrected before waterproofing. Internal transitions can also be shaped to make coating easier and reduce places where dirt collects.
If reinforcing fibres have been used in a render or repair material, make sure the finished surface satisfies the requirements of the waterproofing system. A fibre protruding through a thin coating can create a defect rather than an advantage.
Concrete curing is not the same as drying
Fresh concrete needs appropriate moisture and temperature conditions while the cement hydrates. Good curing improves strength and durability and helps reduce the risk of defects.
The familiar "28 days" associated with concrete is commonly used as a reference age for compressive-strength testing. It does not mean that every concrete pond must automatically wait exactly 28 days before every subsequent operation.
The important distinction is between the structural curing requirements of the concrete and the substrate requirements of the waterproofing product. A pond coating may require a specific substrate age, moisture condition, surface profile and additional cure time after application.
Always use the current technical instructions for the waterproofing product you actually purchase.
Waterproofing a concrete fish pond
Do not assume that ordinary blockwork, render or a generic coat of masonry paint will permanently hold pond water.
Rigid ponds can be waterproofed in several ways, including purpose-designed cementitious waterproofing systems, pond-safe resin or polyurethane coatings, or a professionally installed GRP/fibreglass lining. The correct choice depends on the structure and the finish you want.
The original project documented on this page used G4 pond coating over rendered blockwork. Modern versions of products such as G4 are still available, but the application method should come from the current product instructions rather than from a pond article written many years ago.
In particular, do not improvise primers, sealers or additives simply because they worked with a different coating. Waterproofing systems are designed and tested around particular substrates and preparation methods.
Leak-testing the concrete pond
Once the structure and waterproofing system have completed their required cure, the pond should be tested before fish are considered.
Check all wall penetrations, drains, returns and fittings while the pond is full. A very small loss may be difficult to distinguish from evaporation over a short period, so investigate any unexpected drop in water level rather than assuming that a new pond is watertight.
This is also the best time to test the pumps, filter hydraulics, overflow and return flow. Correcting a leak or plumbing problem is considerably easier before the surrounding paving and landscaping are finished.
Filling and starting a new koi pond
Once the pond is watertight, follow the waterproofing manufacturer's final cleaning or rinsing instructions and remove any waste water that should not remain in the pond.
Tap water intended for fish must be made safe for aquatic life. Do not assume that simply leaving water standing for a few days will always remove the disinfectant used by your water supplier.
Start the filtration and confirm that all pumps, returns and drains operate as intended. The biological filter then needs time to establish before the pond can support a substantial fish load.
Do not use the clarity of the water as proof that the pond is ready for koi. Monitor ammonia and nitrite and add fish gradually once the biological system is capable of processing their waste.
See our detailed guide to cycling a new fish pond before adding fish.
Finishing the area around the pond
The structure is only part of the finished project. Leave practical access to the filter, pumps, drains and any valves that will require servicing.
Coping and paving should provide a safe edge around the pond without obstructing equipment that may later need to be removed. The original project also added a wooden structure above the pond to provide partial shade.
If children or pets can reach the pond, take the depth and accessibility seriously. A deep koi pond is a substantial body of water and the finished landscaping should not create an unintended easy route into it.
Common concrete pond construction mistakes
- Designing the filtration after the pond is built. Bottom drains, skimmers, returns and filter levels should be part of the initial pond design.
- Copying another pond's slab thickness. Soil, groundwater, wall height and structural design can be very different from one project to another.
- Using an arbitrary concrete mix ratio. A water-retaining structure should use concrete appropriate for its structural and exposure requirements.
- Treating ordinary blockwork as a retaining structure. Raised pond walls must resist the pressure of the water they contain.
- Forgetting pipework before the concrete is placed. Drilling and cutting through the completed shell and waterproofing later adds unnecessary risk.
- Confusing drying with curing. Concrete needs appropriate curing conditions to develop its intended properties.
- Using an incompatible waterproof coating. Use a product intended for permanent immersion and suitable for the chosen substrate and aquatic application.
- Ignoring the coating manufacturer's cure time. A surface that feels dry is not necessarily ready to be filled with water.
- Adding koi immediately after filling. The water must be safe and the biological filtration needs to mature before significant stocking.
- Making the filter area inaccessible. Pumps, UV units, valves and filters all need maintenance eventually.
Concrete fish pond FAQs
How deep should a concrete koi pond be?
Around 1.5–2 metres (approximately 4–6 feet) is a common depth range for a dedicated koi pond. The final design should also consider climate, fish size, pond volume and local conditions.
How thick should the concrete be for a fish pond?
There is no single thickness suitable for every concrete pond. The slab and walls need to be designed for the pond dimensions, soil and groundwater conditions, reinforcement and structural loads.
What concrete mix ratio should I use for a pond?
There is no universal pond mix ratio. Structural and water-retaining concrete should be specified for the required strength, durability and exposure conditions rather than mixed to a generic DIY ratio copied from another project.
Can you build a koi pond with concrete blocks?
Yes. Many rigid koi ponds use a reinforced concrete base with concrete masonry walls. The block type, reinforcement and wall construction still need to suit the structural design, particularly where part of the pond is raised above ground.
Is concrete itself waterproof?
Concrete can be designed for very low permeability, but a DIY block-and-render pond should not be assumed to be watertight without an appropriate waterproofing strategy. Many rigid garden ponds use a purpose-designed coating, cementitious membrane or GRP lining.
How long should concrete cure before filling the pond?
There is no single waiting period that applies to every pond. Concrete and render need appropriate curing, while the chosen waterproofing system may specify its own minimum substrate age and cure time before permanent immersion. Follow the current instructions for the materials used on your project.
Do the corners of a koi pond need to be rounded?
Not necessarily. Rounded transitions can make finishing and cleaning easier, but good circulation depends on the complete hydraulic design, including the position of bottom drains, skimmers and returns. Simply rounding every corner does not guarantee that the pond will have no dead spots.
Can fish be added as soon as a concrete pond is filled?
No. The waterproofing system must first be fully cured and the water must be safe for fish. The filtration system also needs to establish biological activity, with ammonia and nitrite monitored before koi are stocked in significant numbers.
Reader question
What paint brand and did you have to let mortar cure for a month first? All the ones I've seen require 28 days cure first. Also, inside is rounded?
Thank you!
Updated answer (2026): The original pond shown in this article was sealed with G4 pond coating. However, I would not now recommend copying the old preparation method step by step, particularly the use of PVA as a general-purpose sealer or primer.
Modern pond coatings and waterproofing systems have their own requirements for substrate preparation, moisture content, curing time and primers. The concrete or render should first be allowed to cure properly, and then the current technical instructions for the exact waterproofing product should be followed. There is no single waiting period that is correct for every render and every pond coating.
The often-quoted 28 days is a familiar reference age for cement-based materials, but it should not be treated as a universal rule saying that every pond coating must be applied on day 28. The coating manufacturer may specify a minimum substrate age, maximum moisture content or other preparation requirements.
The internal corners of this particular pond were rounded. Rounded transitions can make rendering and waterproofing easier and can help avoid awkward areas where debris collects, but they are not a substitute for good pond circulation. The positions of the drains, skimmers and water returns are what determine how effectively water moves around the finished pond.
Reader question
Concreted the pond, put fish in next day, fished died. What did we do wrong? Used easy crete. Value your advise.
Updated answer (2026): Unfortunately it is impossible to identify the exact cause without knowing the product that was used and without water-test results, but putting fish into a newly concreted pond the following day would raise several serious concerns.
Fresh concrete and other cement-based materials are highly alkaline and can affect the pH of the water. Any concrete, render or waterproofing product must be allowed to cure according to its technical instructions, and some systems also require washing, rinsing or conditioning before the pond is put into service.
Tap water can present another immediate danger. Chlorine and chloramine used to disinfect drinking water are toxic to fish and must be removed or neutralised before fish are exposed to the water. In particular, chloramine should not be expected simply to disappear after leaving the water standing for a few days.
The biological filter also needs to become established before a new pond carries a significant fish load. Ammonia and nitrite should be monitored rather than assuming that a filter is cycled because the pump has been running for a certain number of days.
Before adding fish to a new concrete pond I would therefore complete the required curing and waterproofing process, make the source water safe, run the complete filtration system, and test the water including pH, ammonia and nitrite. Fish should then be introduced gradually once the pond and biological filter are ready.
See our guide to cycling a new fish pond for more information.
Reader question
In building concrete Pond as you narrated, what did you used to reinforce the edges of the Pond?
Updated answer (2026): In the original DIY project, fibres were added to the cement-based render used on the pond. I would now make an important distinction between fibres added to concrete or mortar and the structural reinforcement of the pond itself.
Fibre-reinforced concrete and mortar can have useful properties, including improved crack control and toughness. However, simply adding fibres to a mix should not automatically be regarded as a replacement for reinforcing bars, mesh or other reinforcement required by the structural design.
The walls and edges of a raised concrete pond can be subjected to substantial loads from the water. The required reinforcement therefore depends on the dimensions of the pond, wall construction, ground conditions and structural design. For a large or substantially raised pond, I would use a properly designed reinforcement detail rather than trying to reproduce the fibre mix used in this old project.